Can You Mass Upload Files to Sf Contacts?
TUTORIAL
Importing Data into Salesforce with Skyvia in 4 Easy Steps
How to Import Data to Salesforce
At that place is a number of ways you can import information to Salesforce. Salesforce itself, for case, provides several native tools, like Import Magician or Noon Data Loader. Salesforce Import Sorcerer is a web solution that can import data to a number of predefined Salesforce objects, like accounts, contacts, leads, solutions, entrada members, etc., as well as custom objects. You tin can start Salesforce Import Wizard directly from within the Salesforce interface itself.
Skyvia is likewise a web based solution, and it offers a number of boosted features over the standard Salesforce tools. It allows you lot to import CSV files from file storage services or FTP and run import automatically past a flexible schedule. Skyvia offers flexible mapping settings for powerful data transformation. The following tutorial demonstrates how to utilize Skyvia and its data import features.
Import Data in CSV File to Saleforce
In our tutorial, we have focused on how to upload data from CSV files into Salesforce as users often demand to import a large number of accounts and contacts or other records from CSV files to Salesforce in a single go. When performing majority data import into Salesforce with Skyvia, the format of incoming data does not have to match the format of the Salesforce objects. In Skyvia, yous can apply unlike types of mapping to convert the structure and content of information in CSV files or in the source organisation to the structure and content needed in the target system.
Moreover, in improver to importing data from CSV files, Skyvia tin as well import binary information from nothing archives into Salesforce. If you desire to know virtually how to import attachments into Salesforce or to read general information about import operations, follow this link.
To become data into Salesforce, yous need to create an import package. When creating an import packet, Skyvia allows adding several import tasks to one package and, thus, importing several CSV files into Salesforce – accounts, contacts, leads, opportunities, attachments, etc. – in a single import operation. Y'all can easily configure relation mapping and build relations betwixt objects.
Automated Data Import with Scheduled Information Loader
What is also convenient is that you tin can schedule information import into Salesforce for automatic execution. Information technology can be useful for those users who need to import automatically updated CSV files from the file storage into Salesforce. The import packet will run automatically on the specified days and at sure fourth dimension intervals. If the Salesforce connection becomes invalid or some errors happen within the package, y'all will receive notifications to your account e-mail or to other additional emails you accept specified.
How to Import Data into Salesforce in 4 Steps
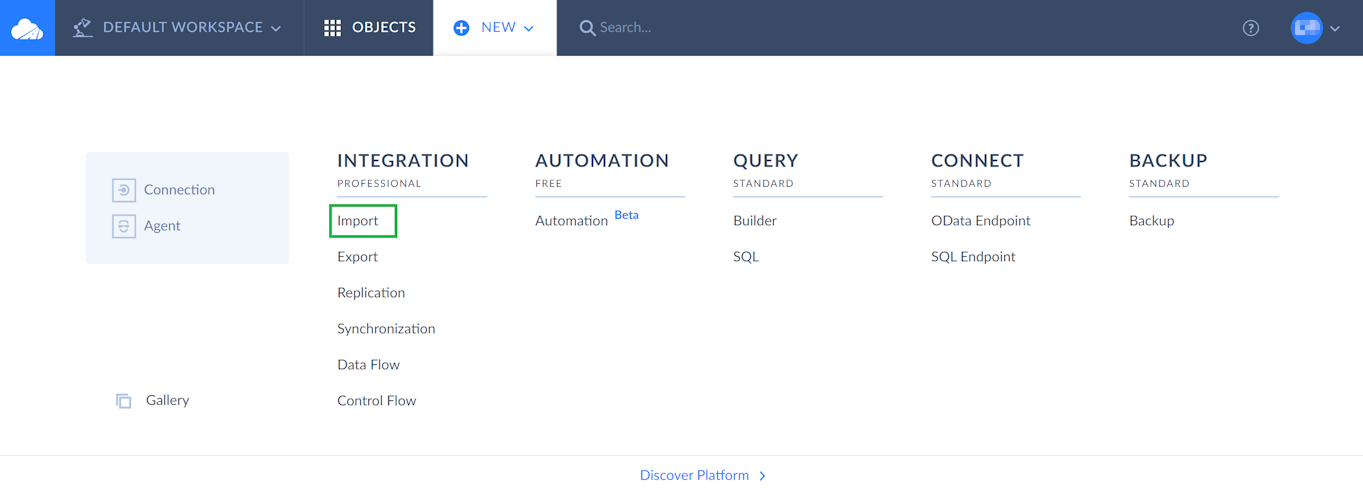
After signing in to Skyvia, yous tin can create an import packet by clicking +NEW in the meridian card and selecting Import in the Integration column.
The parcel editor opens up. It allows y'all to specify source settings, select/create target connection, add import tasks, schedule a package for automatic execution and use additional options if necessary. Amongst other things, hither you lot tin can enter the package name or leave it Untitled.
Expect at the screenshot beneath and follow the steps to successfully create a package and import information into Salesforce.
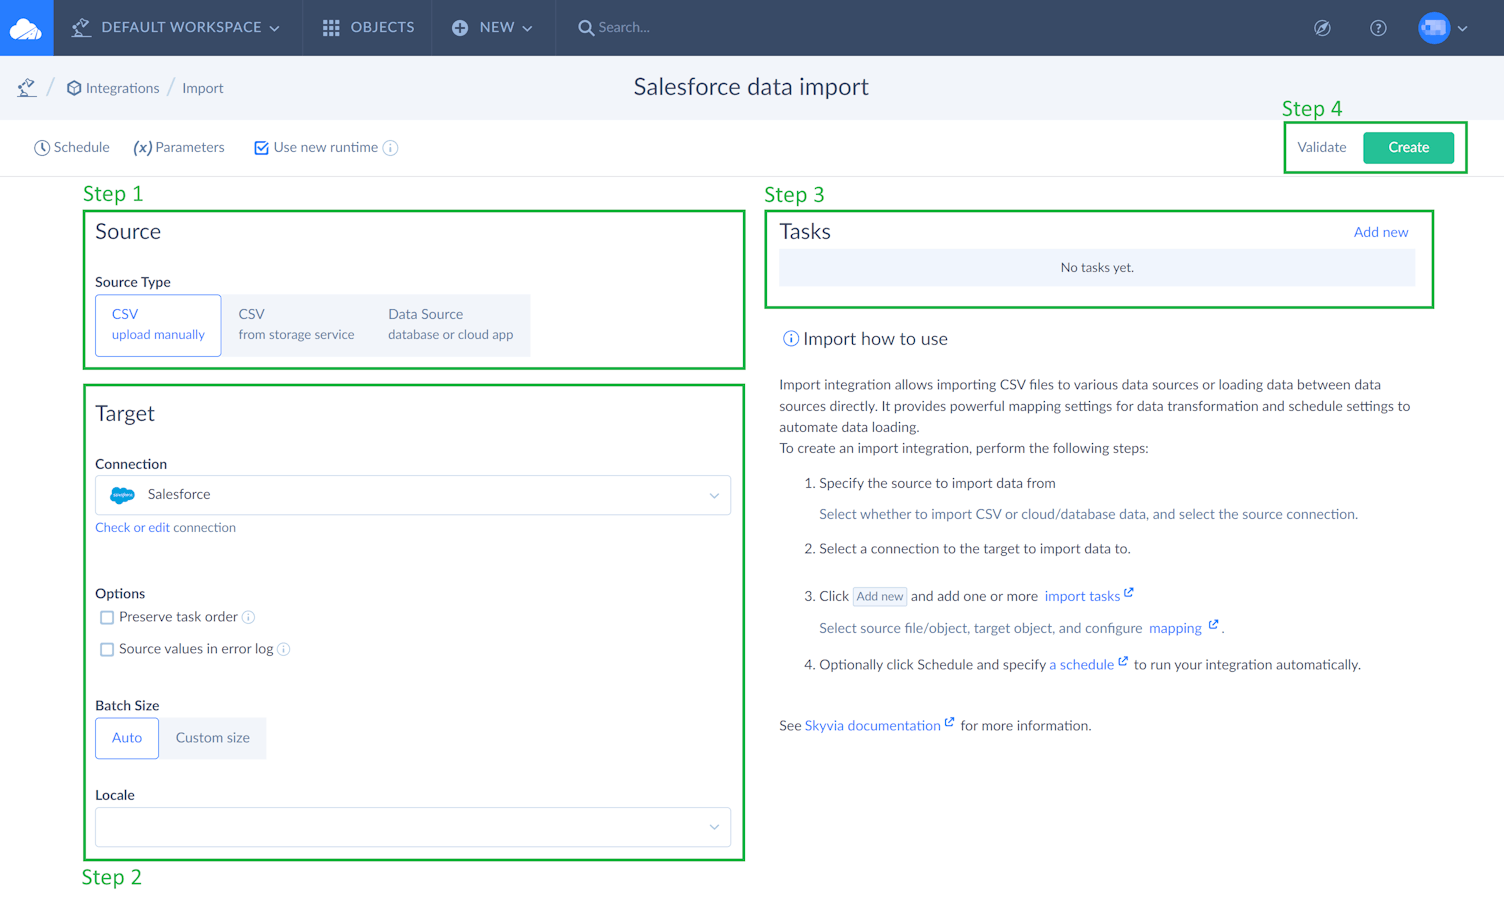
Specifying Source Settings
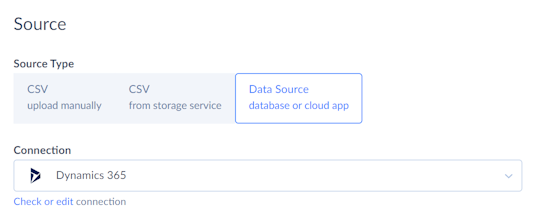
Skyvia offers iii scenarios of data import into Salesforce. First scenario is when you are getting data out of a CSV file into Salesforce. This scenario is selected in Skyvia past default, and nosotros take information technology as a basis for our tutorial.
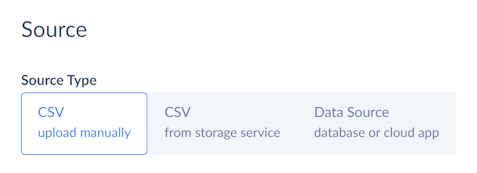
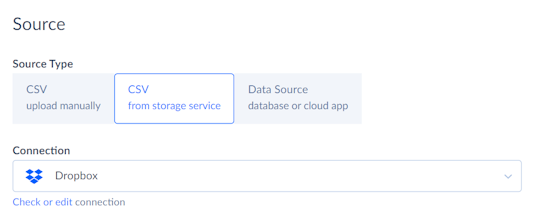
Nevertheless, if you want to import data from CSV file(southward) placed to a file storage service or FTP, use the second scenario and click CSV from storage service in the source type. After this, click the Connection drib-downwards list and select a source connection proper name to import data from. Skyvia supports importing CSVs from Dropbox, Box, Google Drive, FTP, SFTP or whatsoever other.
The third scenario is for those users who need to import data from databases/deject apps into Salesforce. Our platform supports a wide variety of databases/cloud apps — import operations between them and Salesforce. To choose this scenario, click Data Source database or deject app and select a source connexion like Dynamics, QuickBooks, Google BigQuery, etc., to import data from them into Salesforce.
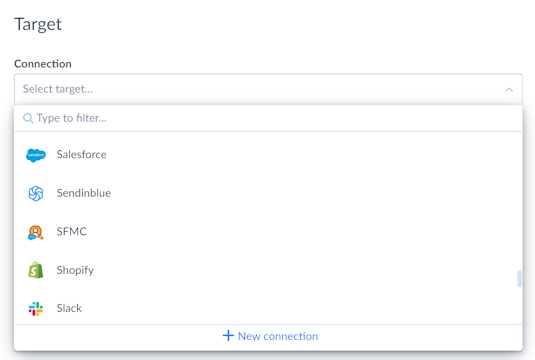
Selecting/Creating Target Connection
Under Target, click the Connexion drop-down list and either select the existing Salesforce connexion or create the new one. To create a new one, click the +New Connectedness link at the bottom of the connection drib-downwards list.
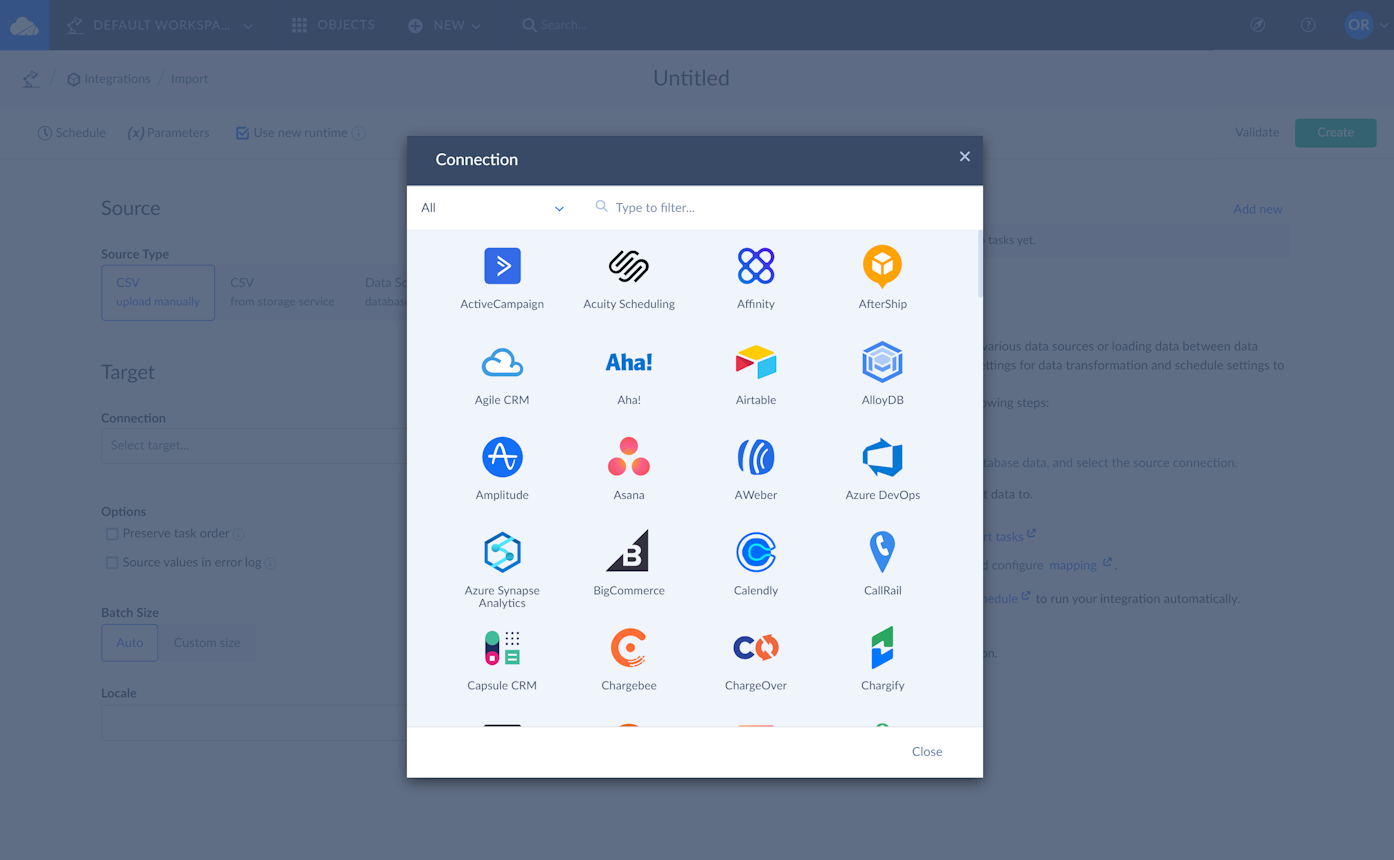
After clicking the +New Connectedness link, the Connection window opens. Search for Salesforce and select it from available sources.
As soon as yous practise it, you lot are automatically transferred to the Salesforce Connection window, in which you can specify required parameters.
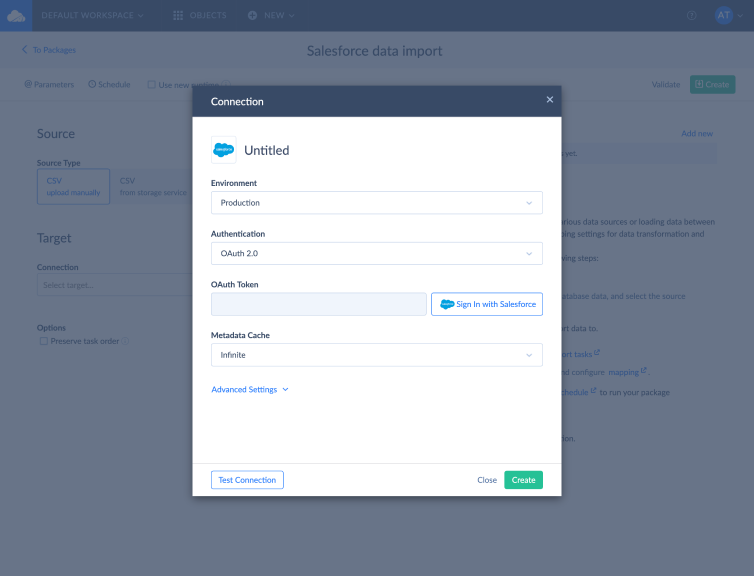
In the Salesforce Connexion window, perform the post-obit steps:
- Click Untitled and specify the connexion proper noun.
- Select the Salesforce environment type yous want to utilize – Production, Sandbox or Custom.
- Select hallmark method to connect to Salesforce – either OAuth 2.0 or User Proper noun & Password. If you don't heed storing your Salesforce credentials on the Skyvia server, select User Name & Password.
If you adopt not to shop your credentials, select OAuth ii.0. Later on that, click the Sign In with Salesforce push below and log in to the Salesforce website in the opened browser window. The OAuth token is generated automatically and volition be used for authentication. It is bachelor only if the OAuth 2.0 authentication is selected.
- Optionally, specify Metadata Cache parameter. This parameter determines for how long the cached metadata for the connection is considered valid. By default, metadata cache never expires – Skyvia resets it automatically.
- Click Avant-garde Settings and reset bachelor parameters if required.
- Select to use Bulk API or SOAP API. By default, Majority API checkbox is selected. Bulk API is based on REST principles and is good for bulk import of Salesforce data. To find more information nearly the Salesforce connection parameters, click here. Additional information about Bulk API tin be found in Salesforce.
- At the finish, test Salesforce connectedness and click the Create connection button.
Task EXECUTION ORDER
By default, Skyvia analyzes data relations and executes tasks in order, depending on these relations. If tasks are not related, Skyvia may sew together to 4 tasks in parallel.
If y'all want to run your tasks exactly in the same social club they are listed in the parcel, select the Preserve chore order check box in target options.
Importing Accounts, Contacts and Leads into Salesforce
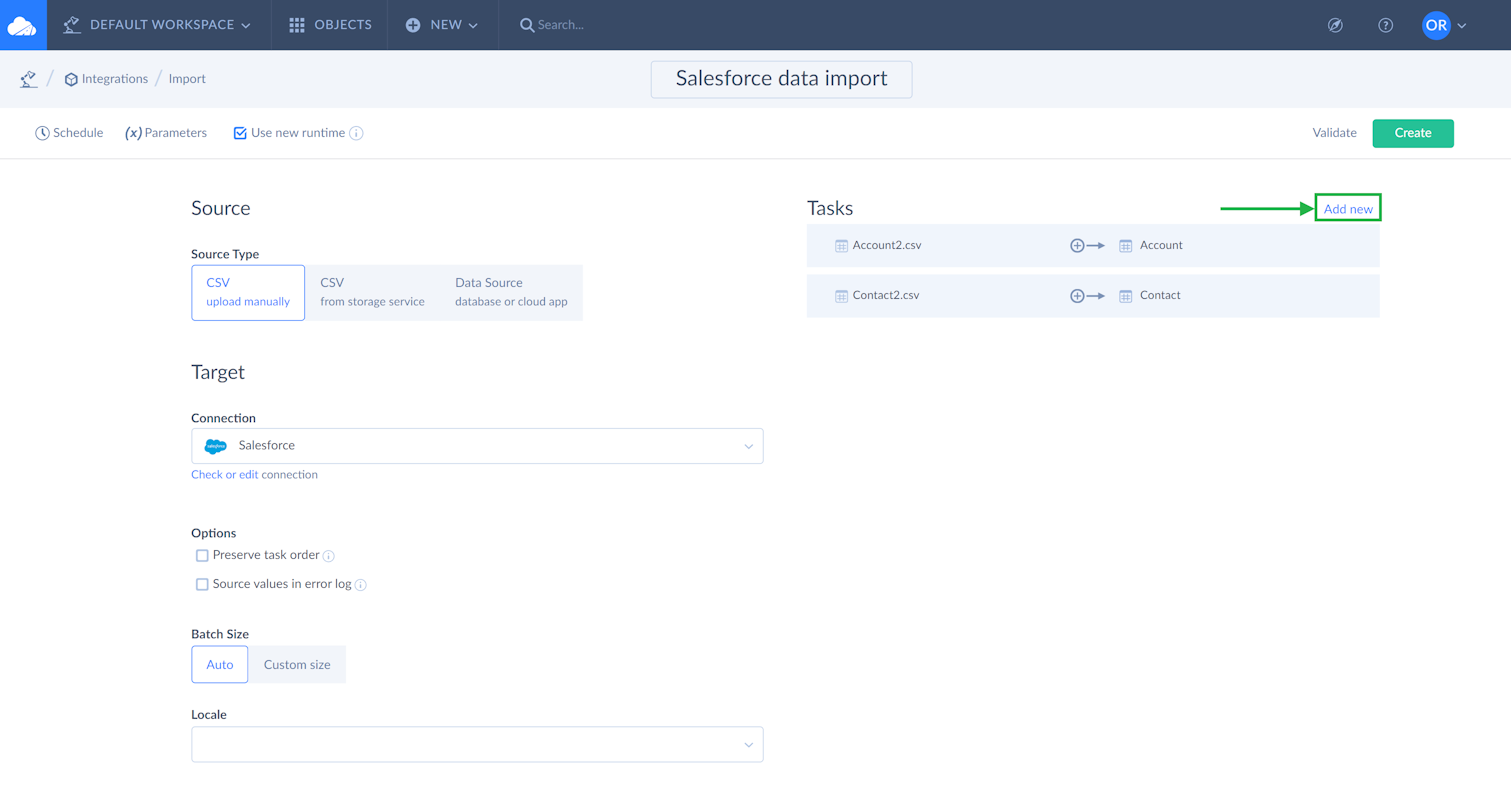
On the 3rd step, we add tasks to import Accounts and Contacts as CSV files into Salesforce. You tin as well import Leads, Opportunities or whatsoever other object into Salesforce in the same fashion if required. To add a chore to the package, click Add new on the left of the bundle editor. The task editor window will open.
Delight note that in Skyvia yous can add one or more tasks. However, in each job you can import merely one CSV file, adapt its source, target and mapping settings. If you desire to add together another CSV file, create a new task.
Adding A Job TO IMPORT ACCOUNTS INTO SALESFORCE
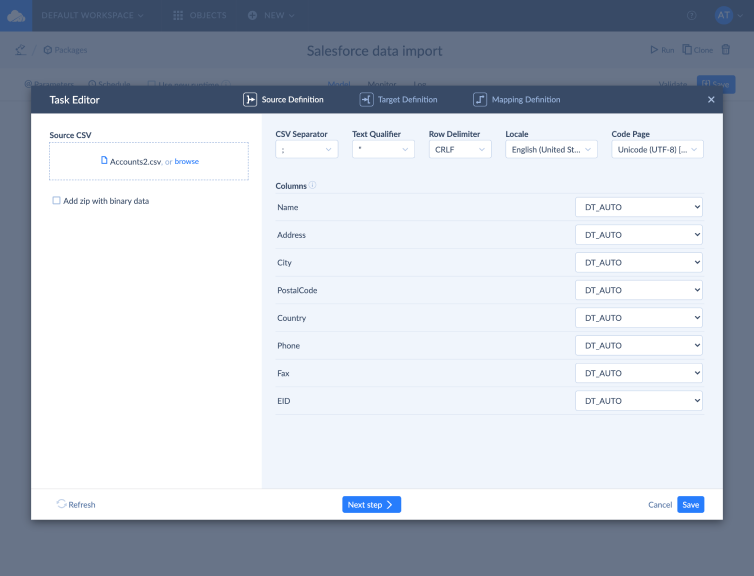
To import a CSV file from your computer, drag your file to the driblet here your file area or click the browse link and upload the Accounts CSV. You can also add a zip file with binary data by selecting the corresponding check box.
Check if the CSV Separator is selected correctly and adjust other CSV options if necessary.
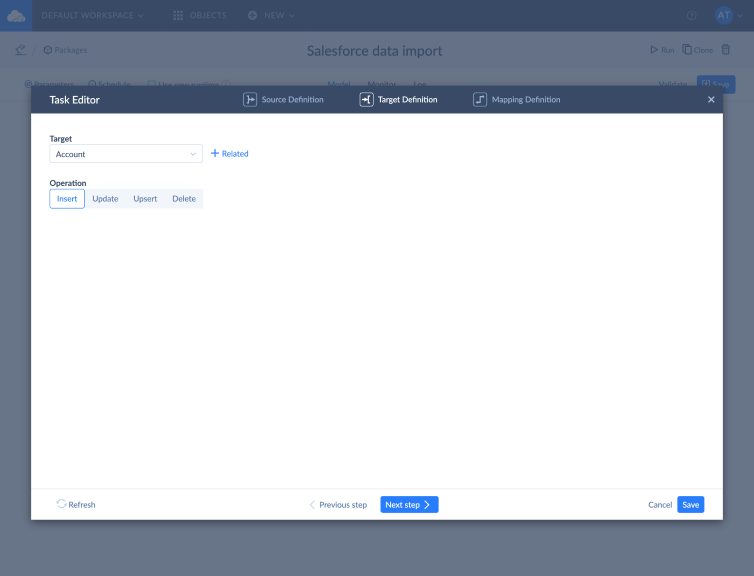
Click Next step to commencement adjusting target settings. From the Target list, select the Account object to import data to. Select the type of performance for the task: Insert, Update, Delete, or Upsert. In our case, we use the INSERT Operation.
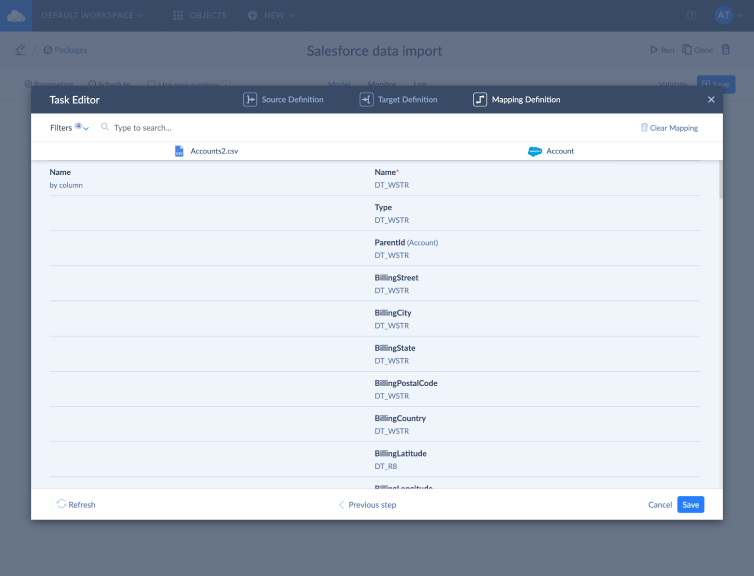
When everything is set up on the Target Definition page, click Next step to start configuring mapping. Target columns, which are marked every bit Required, must be mapped in order for the task to be valid. In our case, it is the Name column, and it has been mapped automatically as nosotros have such a column in our CSV file. Moreover, Telephone and Fax columns have as well been mapped automatically. To salvage the kickoff task with Accounts settings, click the Relieve button.
ADDING A Job TO IMPORT CONTACTS INTO SALESFORCE
With Skyvia all the relations between the imported files, tables, or objects will be preserved. Yous demand just to specify these relations between the source files, tables, or objects.
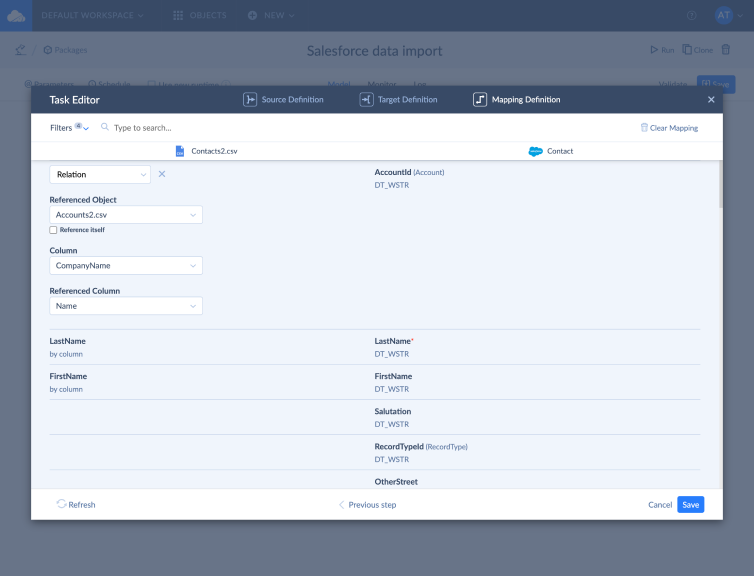
Every bit the second task, nosotros add together Contacts CSV file and repeat the same steps equally with Accounts CSV file. At the cease, nosotros configure relation mapping between Accounts and Contacts. The relation between Account and Contact objects is determined by the AccountId field of the Contact object, which stores the ID value of an account, the contact belongs to.
To configure the relation, perform the post-obit steps:
- Click the Column listing on the left next to AccountId and select Relation;
- Click the Referenced Object column and select principal CSV file (in our example it is Account2.csv);
- And so, in the Cavalcade listing, select the foreign primal cavalcade from the Contacts.CSV file — CompanyName;
- In the Referenced Column listing, nosotros select the corresponding column from the Accounts.CSV file — Name.
Adding A Task TO IMPORT LEADS INTO SALESFORCE
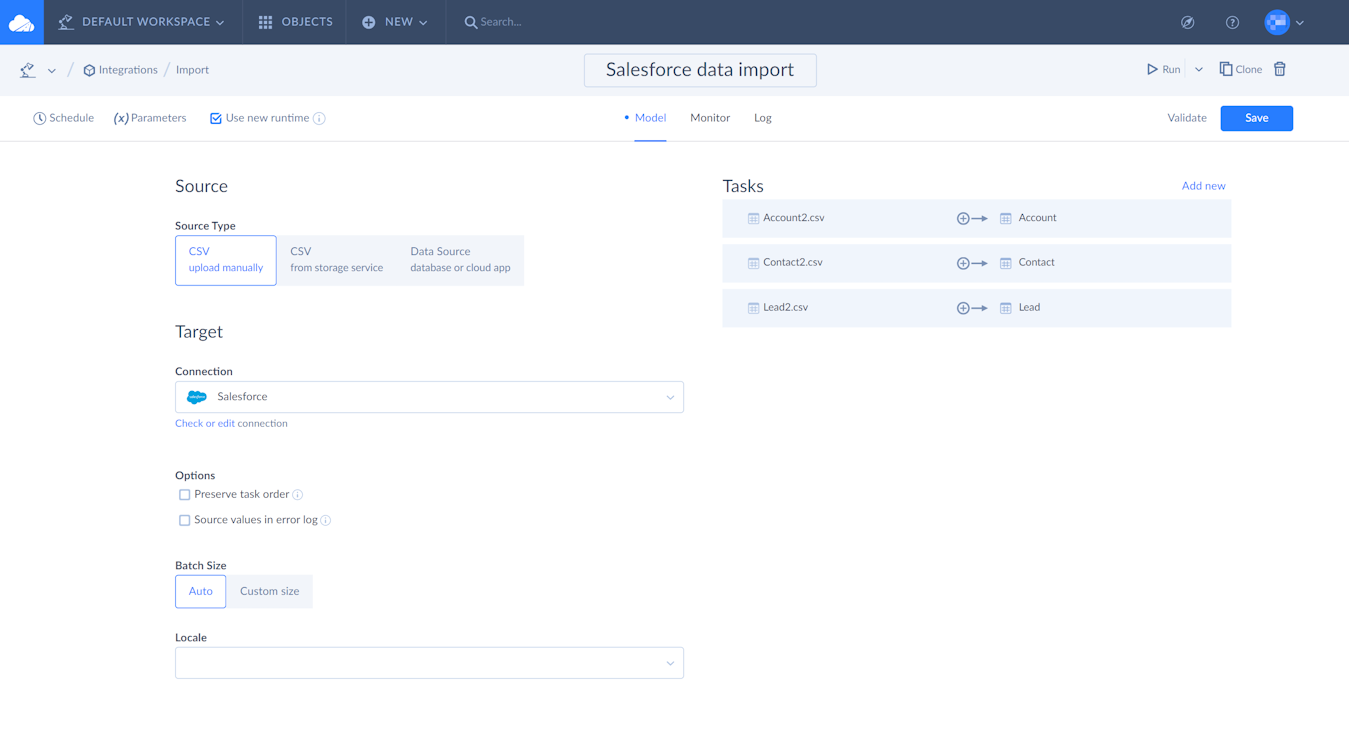
In the screenshot below, yous tin can see two tasks already added to the package. If needed, y'all tin add together a new ane.
You tin can import Leads as well as import Opportunities into Salesforce the same mode equally described in a higher place – upload CSV files with corresponding data (each CSV in a dissever job), adjust source and target settings, choose import operation type – INSERT, UPDATE, DELETE, UPSERT, configure mapping settings and check Salesforce Pb and Opportunity required fields.
Saving and Running an Import Package
When your package for Salesforce data import is fix, click the Create button on the correct of the page. After that, click Run to immediately run the bundle or expect until the package schedule starts if yous scheduled the packet. Yous tin read more about automatic parcel scheduling beneath.
As before long as the bundle is created, yous volition run across 3 tabs in the middle of the toolbar – Model, Monitor, Log.
Model tab shows source type and target connection, tasks/schedule/parameters of the package, etc. On this tab, you can edit your existing tasks or add new ones to the package, edit schedule, parameters, etc.
Log tab shows older runs or runs for a specified period.
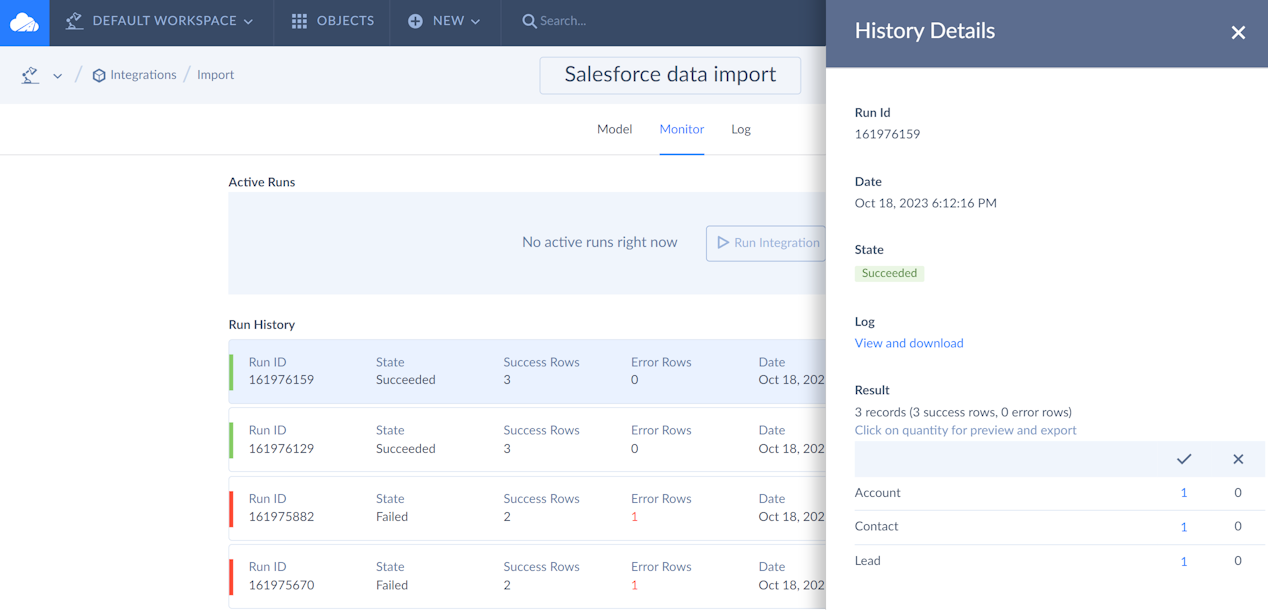
Monitor tab shows the current packet status and 5 most recent packet runs. When you lot click a certain packet run, the History Details window opens. In this window, if some rows failed, the number of failed rows for a tabular array is displayed equally a link. You can click this link to download a CSV file with detailed per-tape error log.
Scheduling Salesforce Import
In improver to manually running the import packet, you can schedule it for automatic execution. This might be useful if you need to import automatically updated CSV files from the file storage into Salesforce and to run import operations on certain weekdays. You may likewise schedule an operation to a later on time.
Based on your needs, y'all tin can schedule the created package for ane-time or recurring executions. Recurring package runs can be executed on a daily, weekly and monthly ground — once a day at a specific time or multiple times with intervals. You tin select certain weekdays to schedule data import into Salesforce besides as to impose time period restrictions on the packet execution for a solar day.
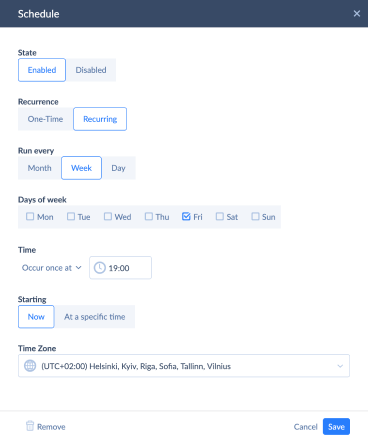
To set a schedule for a package, click Schedule on the toolbar left side.

The schedule editor window opens. In our tutorial, we schedule the package to execute automatically every Friday at a certain time. For this nosotros need to:
- Click Week under Run every and select corresponding check boxes next to Friday.
- Specify the certain time the package should run every Friday. In our example, we have scheduled the packet to run at 19:00.
- At the end, click Save to save your packet schedule.
Skyvia offers various subscription plans including the free one with 100,000 records per calendar month. Skyvia can work with all Salesforce editions starting from Salesforce Essentials, and the cost does not depend on the number of users and Salesforce orgs. Try Skyvia Import and considerably salve your time, coin and efforts in the future.
mcmullenherat1941.blogspot.com
Source: https://skyvia.com/tutorials/how-to-import-data-to-salesforce
Post a Comment for "Can You Mass Upload Files to Sf Contacts?"